Warning! This post is long and contains lots of boring photos of the work-in-progress. Mostly it’s for anyone looking for ideas if they happen to be wanting to make “How to Train Your Dragon” costumes (these are from the first movie).
When I started making the kids’ Halloween costumes this year, first I researched (Google images is my friend), then I sketched, then I researched some more, and finally I began designing. Since I cannot really sew from a pattern (I prefer freestyle sewing, ha!), I take measurements and make my own “patterns”. The designing stage took a long time, because of the amount of details and figuring out how to make the costumes wearable. My kids are mostly interested in being comfortable, and I definitely want them to be able to move around freely! I made a list of all the separate items I would have to make, and the things that I would have to buy for each item. When I finally got around to going to the craft store to purchase the materials, I had 2 weeks left to finish the costumes! It was apparently not quite enough time!
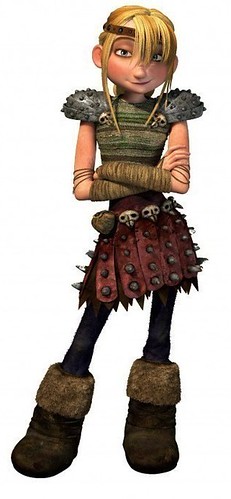
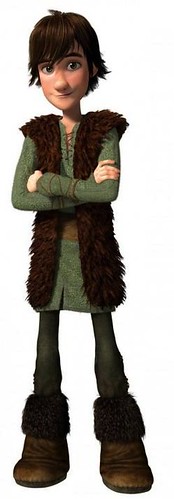
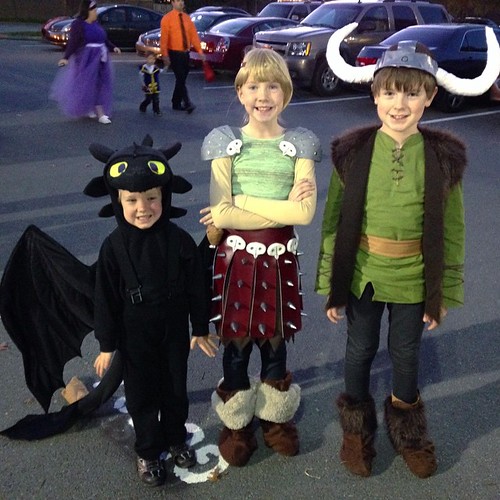
I started with Eliza’s Astrid costume because I was pretty sure it would be the most time-consuming. Astrid is a Viking dragon-fighter, and she has quite the outfit, complete with a spiked skirt, shoulder armor, and bird skulls for decoration:
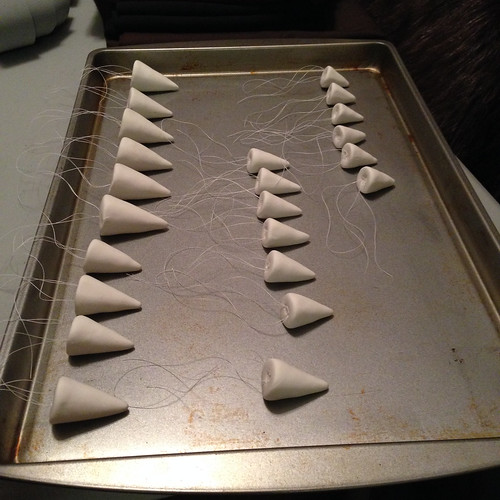
I gathered ideas from other people who have made the costume, and decided to make the spikes and skulls from Crayola Model Magic. It is pretty neat stuff- very lightweight, paintable, and it dries overnight. Unfortunately, I found that it is prone to tearing (3 spikes were torn off by the end of Halloween night). I was concerned about how they would attach, so I embedded thread in each spike and skull while I was making it, and after it was dry I coated the place the thread was embedded with super glue. I used the thread to attach them to the skirt, as well as hot glue! That kept them attached, but didn’t keep them from tearing. Here are some pictures of the process:

First I made the skull shape, then used a toothpick to create indentions
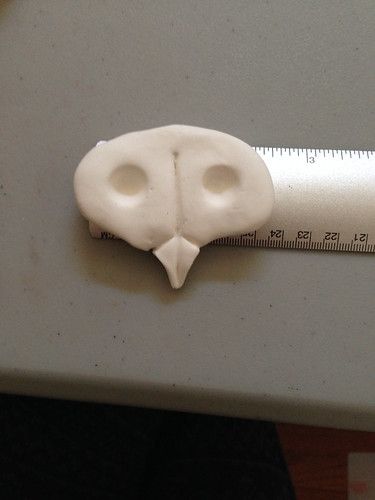
The eye sockets were made with the rounded end of a pen
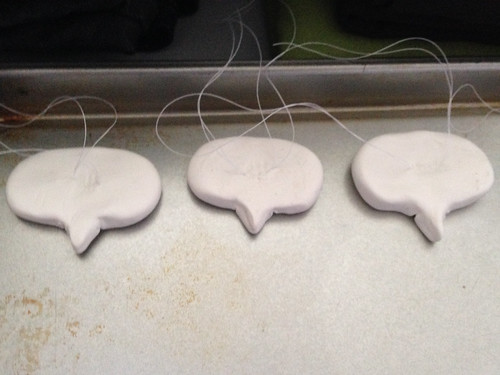
Drying bird skulls (they are upside down) with thread embedded in the back
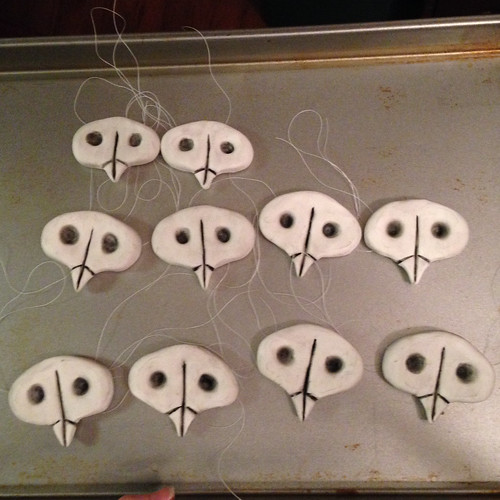
Once dry, I painted the lines and eye sockets black and lightly brushed watered-down black over the whole thing. I actually think I should have added some brown and made them a little darker, but oh, well! I made 2 smaller skulls for the shoulder armor, and 8 skulls for the waist of the skirt.
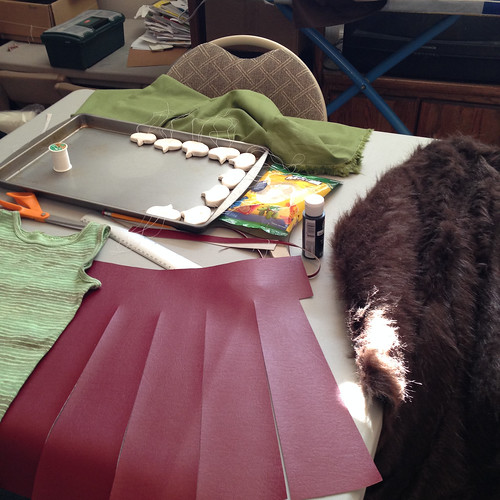
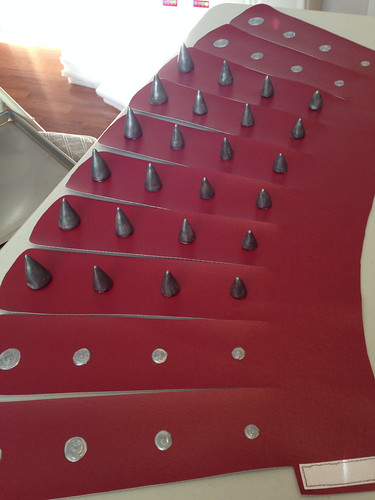
For the shirt I found a woman’s tank top that was cream-colored with tan and brown irregular stripes. I had to cut it down to Eliza’s size (which was more difficult than it seems it should be!) Astrid’s shirt is an irregular green/brown stripe, so I dyed the shirt green, which turned out better than I thought it would! I made the skirt out of maroon leather-looking vinyl. I didn’t get a good picture of it right after I cut it, but I made it with a bit of a curve so that the strips are a little wider at the bottom than the top. My work space looked pretty cool:
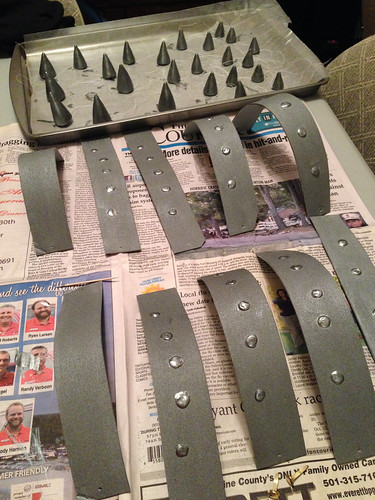
I made Astrid’s shoulder armor out of gray craft foam, which I cut into strips and shaped by first attaching the strips together with brass brads, then used a hair dryer to heat the foam just a little so that it would stay curved. Here they are with the bird skulls, which weren’t attached yet:

I painted bumps on the shoulder armor with puffy silver metallic paint. Astrid also wears a brown underskirt with a jagged edge (which I would make jagged later by sewing on a strip of the same material to the front side of the skirt in a jagged line, then turning that inside out so that I had a nice finished edge). So far, so good:
I made the headband from a strip of leather and silver circles that I found that were made to be ironed on. I hot glued them to the leather. I bought some fake blond bangs pretty cheap off eBay (Eliza said she was NOT wearing a wig!) The effect was pretty good, at least from the front:
I made the spikes out of Model Magic and also embedded thread in them. I made 4 different sizes, as the spikes are larger at the bottom and smaller at the top:
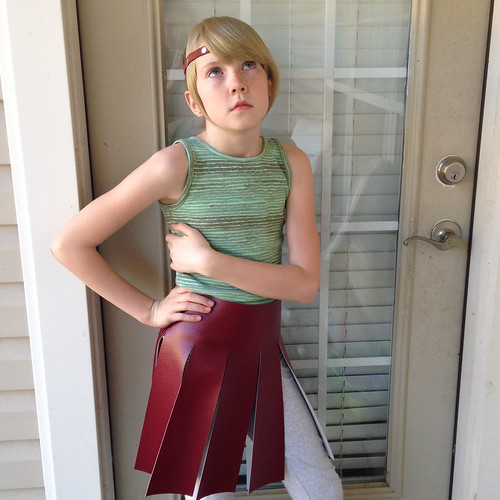
It was coming together! Here I was trying to get an idea of how the skirt would look:

I took a break from Astrid and worked on the other costumes while waiting for the Model Magic to dry completely, but I won’t mix them up here! After they were dry, it was time for paint! I painted the spikes with a mixture of metallic silver and black acrylic paint. I also took the shoulder armor apart and brushed some of the acrylic paint on the strips to give them a more metallic look:
For each spike, I threaded my needle with one thread and poked it through, then the other thread and poked it through in a different spot, then added hot glue to the bottom of the spike before pressing it down and tying the threads together on the backside. Is that complicated enough for you? :) It was very tedious, but I got it done!
I decided not to make the spikes go all the way around- it would be difficult to sit down, and I was tired of making spikes! So I just painted circles with the puffy paint on the back 4 strips of the skirt. Before I added spikes and things, I sewed Velcro to the back so that it would be wearable.
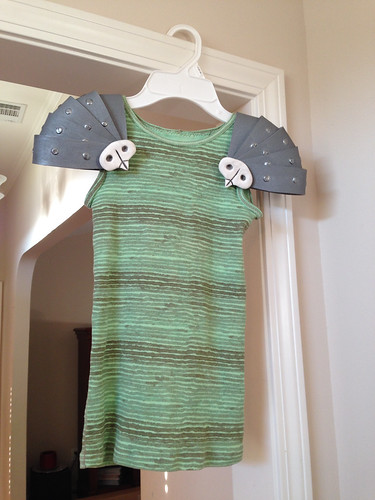
I put the shoulder armor back together and added the bird skulls with the thread and hot glue. I attached Velcro to the shoulders of the shirt and to the inside of the armor so they would stay on:
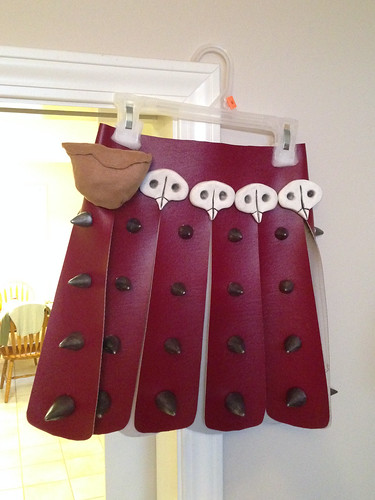
The skirt was almost finished! I made a little tan pouch and stuffed it (my daughter was upset that it wasn’t a real pouch, but I didn’t have time for that!) I lined the skulls up and attached them the same way I attached the spikes. You can see how the skirt is curved in this picture:
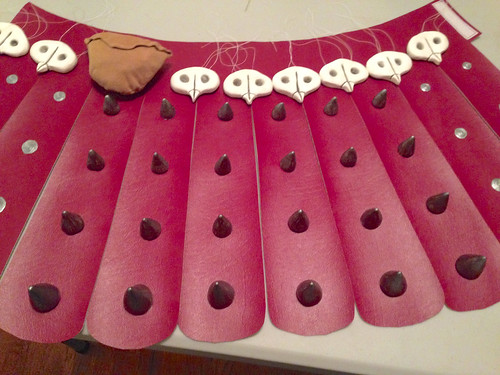
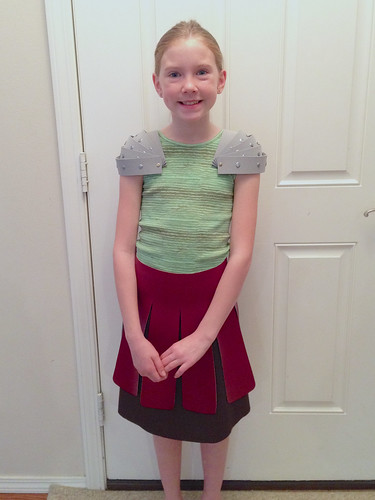
The finished product:
I made super quick boot covers with material and elastic, plus some fuzzy slipper socks that I turned inside-out and pinned on for the cuffs (we’ll use those for our feet later!) I also made the arm wraps (actually after Halloween- I ran out of time!) from material, elastic, and suede lace. Add some blue leggings and a cute girl, and this is what you get:
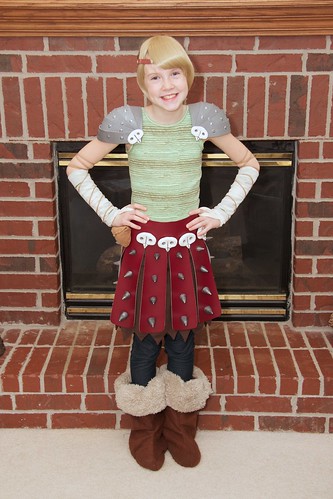
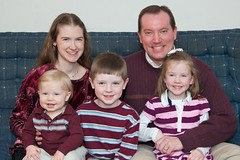
I was pretty pleased how it all turned out (and I’m glad, because it was a LOT of work!) Here’s a comparison:

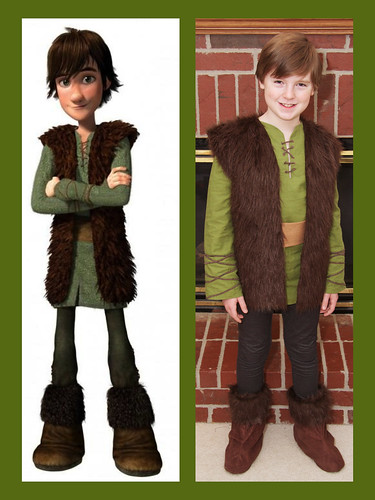
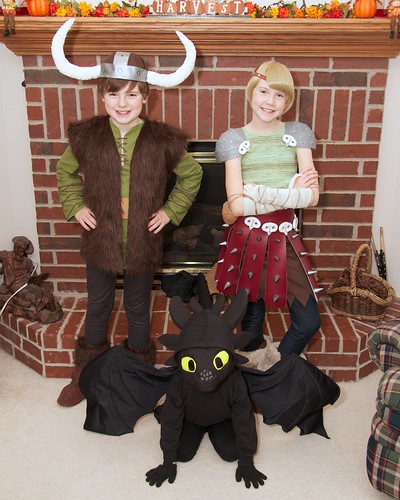
On to Hiccup! He’s a Viking, too, but a little unsure of his place among them, since he is small and less fierce than your average Viking:
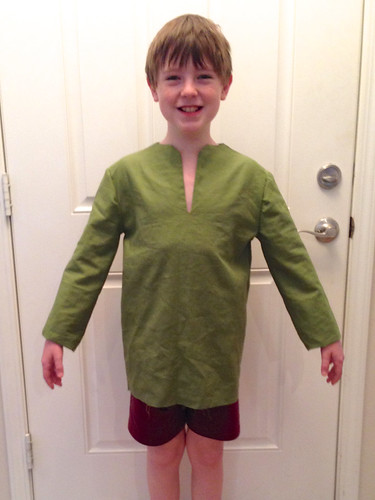
I didn’t take many pictures of the process for this one, as it was mostly just basic sewing. It would probably be a lot easier if I could just use a pattern! I started by making a basic tunic, which I have made before for other costumes. I hate sewing sleeves, but these turned out ok (after 3 times of attaching/ detaching the first one!) This was me trying to get an idea of the right sleeve length for my son:
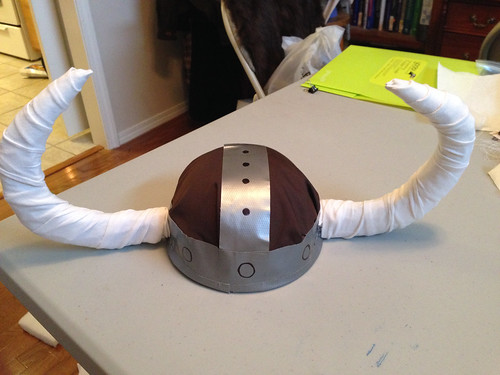
I made a Viking hat by covering a cheap play police helmet with cloth and duct tape, then attaching some horns I made out of stuffing and duct tape covered by strips of stretchy cloth (from old leggings):
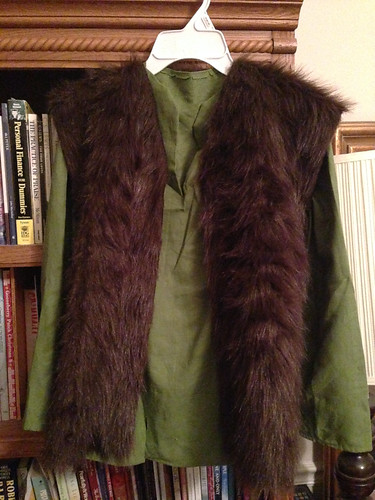
I found the perfect fake fur cloth for the vest, which was pretty simple to sew:
For the finished product, I added eyelets at the neck to thread the suede lace through, and I used fabric glue to attach suede lace to the sleeves. We added a strip of tan cloth around his waist, and I bought some dark blue leggings and also made boot covers for him. We even let James’s usually short hair grow out so he would look more like the character:
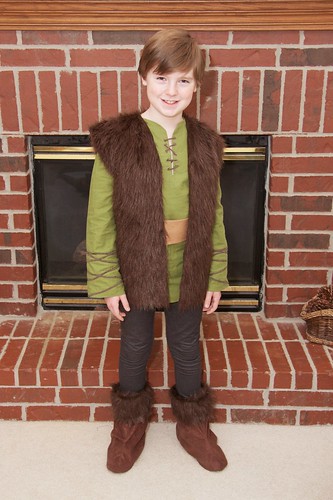
He was pretty convincing:
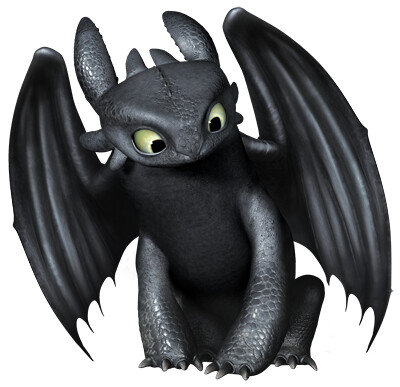
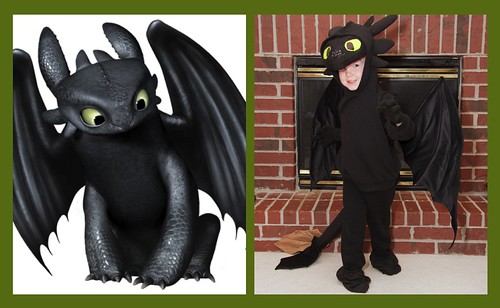
Now, “How to Make a Dragon”. :) Toothless is a black dragon, with lots of fun details that I tried to imitate:
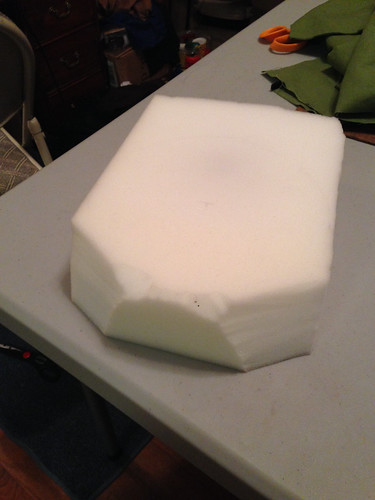
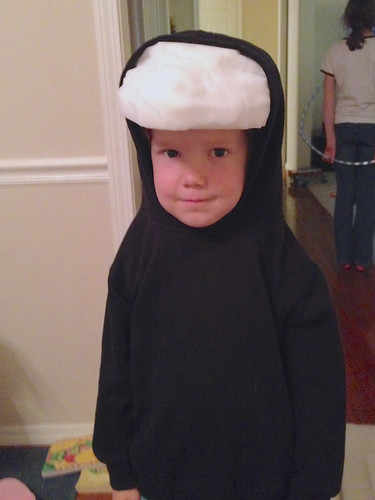
I started with a black hoodie and sweat pants. I thought that would be easiest, and comfy, too! I bought some black jersey material to make the head details and the tail, and I had some shinier black material that I used for the wings. I wanted to make Toothless’s face have some structure, but I was pretty sure Brian would not wear a mask. So I thought I would make a sort of hat with the face on it. After much debate, I finally decided that it would sit on his head under the hood; and we could take it off if needed. I made the head shape out of a block of foam, cutting a circle out of one side so that it would sit on his head better:
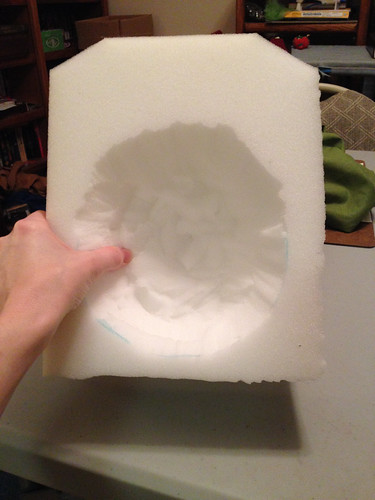

I got Jay to finish the shaping, as I was having trouble getting it right. It looked a little creepy, but cool:

It was working! I found a plastic folder in the right color, and cut eyes out of it, drawing on the pupils with Sharpie:
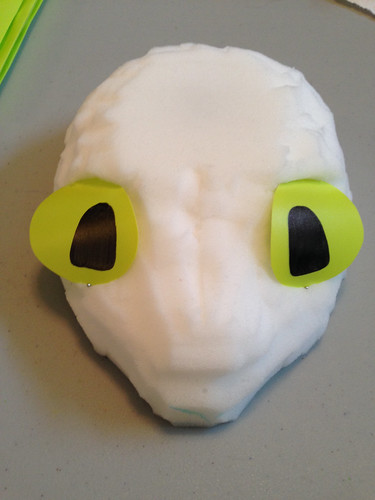
The next part was tricky. I covered the whole thing in fabric, cutting holes for the eyes and hemming the holes.
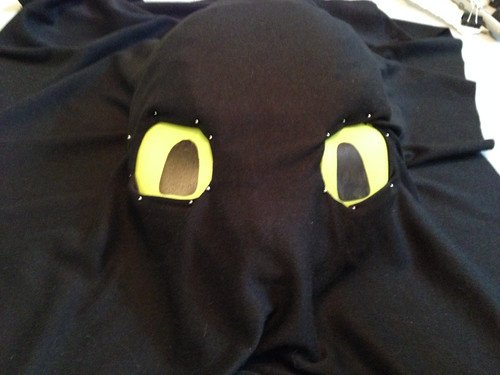
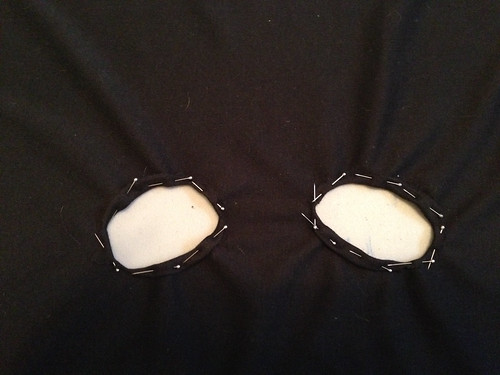
It was difficult to get them just the right size, and the hemming made the holes a little bigger. But it worked, and I hot-glued the fabric to the edge of the eyes, and hot-glued the edges of the fabric to the underside of the head shape:
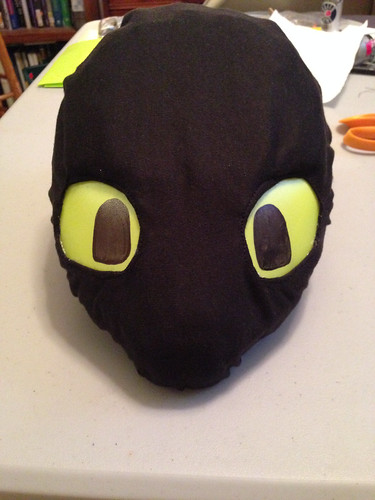
Looking good! Later, I would add some details with a silver Sharpie, but now, on to the hood! Toothless has several different projections coming from his head, so first I cut the shapes out of a type of padding:
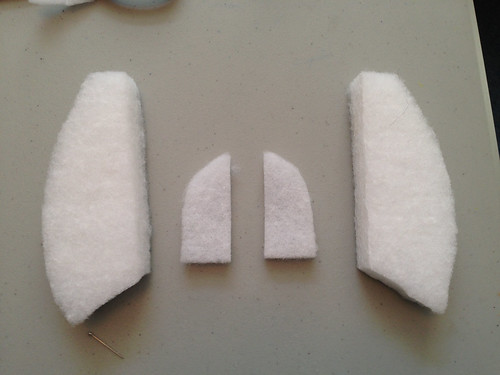
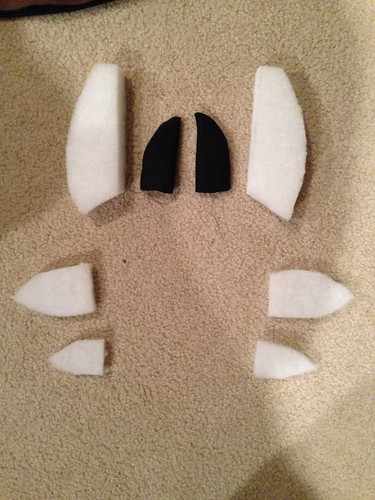
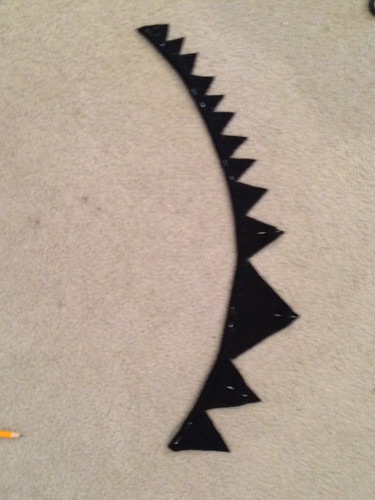
And I sewed covers for each one. I sewed them onto the hood by hand, tucking the raw edges inside and closing it up with a blind/ ladder stitch. I also made a small row of spikes to go along the top of the head. Here is what it looked like when I had the appendages pinned on:

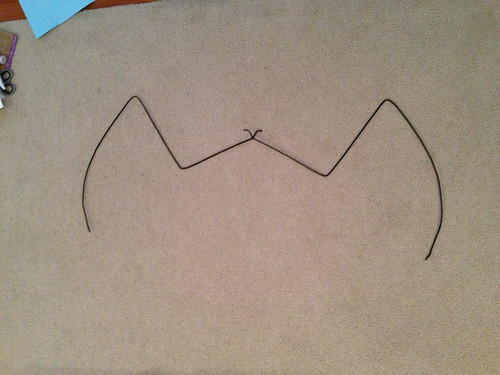
Next came the wings, another tricky part! I decided to use hangers for the wing shape. I wanted big wings, so I shaped one hanger for each wing. Jay taped them together for me, using one more hanger to hold the shape together in the middle:
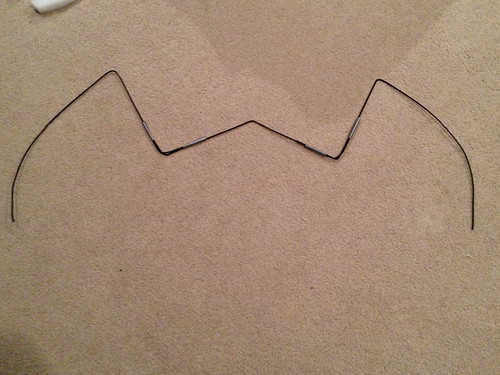
I put the fabric over the wire and pinned where I wanted to sew. I sewed the shape, turned it right side-out, and put the wire inside:
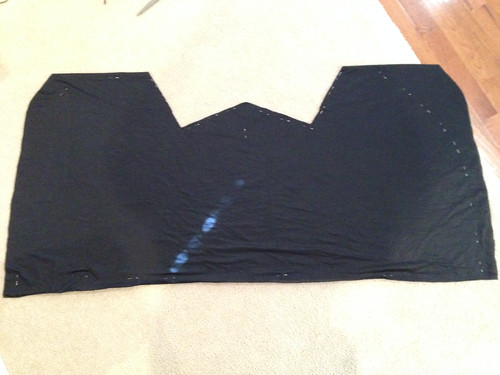

I was having trouble at this point trying to decide how to make the wings a little stiffer. I found a large piece of brown felt left over from another project, which I decided would be perfect! I cut it to shape and stuffed it inside:
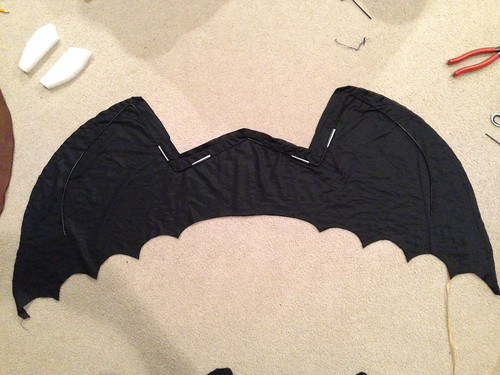
I was quickly running out of time, so I didn’t take pictures of the next steps, which started with sewing beside the wire so that it stayed in my wing shapes (very tricky to do with my sewing machine, but I managed somehow!) I also sewed lines running from the top corner of the wing down to each point. Then I did a zigzag stitch at the bottom of the wings to close it all up. I really like the way they turned out:

I just had to figure out how to attach them! I found black adjustable suspenders at Walmart the morning of Halloween, and while I was feverishly working on the tail (which I barely finished in time), Jay safety-pinned the wings to the suspenders and figured out a way to attach them to Brian using loops on Brian’s pants. You can kind of see it in this picture, taken Halloween night:
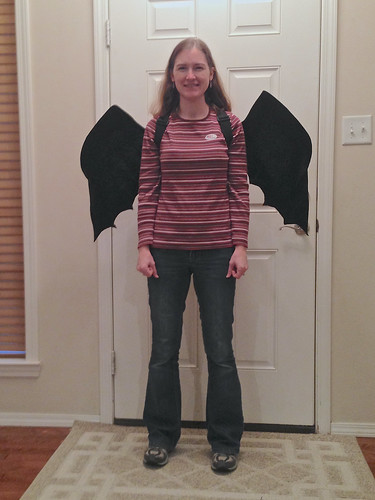
Later, I would modify this so that the suspenders were sewed on to the wings, forming loops which would go around the shoulders. I also added a piece of thin plastic (cut from the lid of an ice cream bucket) to the inside between the straps to give it a little bit of rigidity so that it would not bunch up. Thankfully, Brian got to wear it with my modifications for his book character parade at school. And now, anyone can wear them! Even me (photo courtesy of Brian):
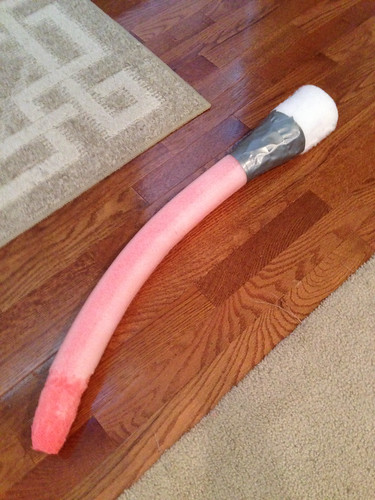
As Jay worked on the wings, I was sewing up the tail, and adding the details that make Toothless unique. I started with a form made from a pool noodle, some batting, and duct tape:
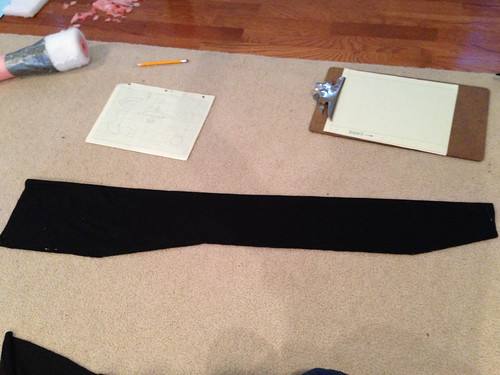
I sewed a tube to slide the tail form into, but I also wanted to add some spikes first by cutting a long slit in the fabric, and sewing the spikes to the inside of the inside-out tube. That way, when I turned it right-side out, all the cut edges would be on the inside. Here’s the fabric for the tube:
And here’s the spikes I made:
I did the same thing for the tail flaps that are at the base of the tail and the end of the tail. One tail flap is brown, because in the movie he is missing that one and Hiccup makes him a prosthetic so he can fly. You can kind of see the finished product here (although the biggest spikes refused to stand up):
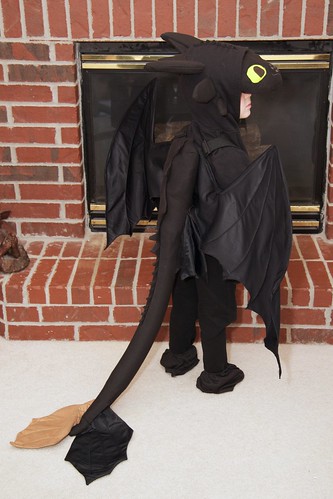
Since we were totally out of time at this point, we pinned the tail closed at the top and pinned the whole thing on to the wings. I also modified this later, sewing the tail completely closed by hand, and using Velcro to attach the tail to the wings. I wanted it to be removable in case we want to use the wings for something else some day. So, Toothless was finally finished:

Brian loved his costume! It was a little unwieldy, as he had to squeeze through doorways and his tail got stepped on many times, but I think it was worth it to have a costume that looked pretty close to the original thing:
When he looked down, it was really neat:
I did have some fun making these costumes, but when it got to the end I had worked so hard that I was exhausted. I don’t think my husband will let me do anything half so complicated next year, since I cannot seem to start early enough! But I was proud of my efforts and it was fun getting to show off my cute kids in some neat costumes that I made. I’ve made other costumes, but I think these were the most involved. You can check out our Princess Bride costumes from the previous year, or our Star Wars costumes the year before that (which I did not make), or some of the others from past years. So, if you are crazy enough to attempt these costumes, I hope this helps in some way! Start earlier than I did and have fun!


")

")
")


November 16, 2014 at 9:19 am
You did a really amazing job!
September 25, 2015 at 12:44 am
amazing!! I love the detail in the Astrid costume. Well done
October 16, 2016 at 5:45 pm
That is amazing!! Well done mom!!
January 24, 2017 at 5:31 pm
Hi Lauren, all the costumes are great!
Would it be possible for you to prepare the same Astrid costume for my 8 years old daughter?
If yes, how long could it take and how much would it cost?
Kindly contact me on my email address debora.minna@gmail.com.
Thanks a lot!
Deb
January 24, 2017 at 5:53 pm
Thank you for your kind words! Unfortunately, I do not make costumes to sell. It takes me too long! Sorry!
Lauren
September 15, 2018 at 12:32 am
Thank you so much for this post! It’s helping me a lot preparing my sons’ Hiccup and Toothless costumes!
September 17, 2018 at 2:00 pm
Glad this was useful for you!
October 24, 2019 at 7:45 pm
These are amazing! I’m impressed with your attention to detail. Thanks for posting your instructions and photos. They are super helpful.
October 24, 2019 at 10:58 pm
Thanks for your kind words! I‘m glad it was useful!